
How To Repair Stone Walls
The first step to repairing stone walls is to assess the damage and gather tools and materials. Then, prepare the work area by clearing away plants and debris.
If you’re replacing stones or repairing cracks and gaps, choose replacements that closely match the original stones for a cohesive look. Finally, finish and seal the wall to protect it against moisture infiltration.
Assess the Damage
Stone walls can add structure and a beautiful aesthetic to any space, but over time they can become damaged. It’s important to assess the damage and understand what needs to be repaired, so you can proceed with confidence.
Begin by thoroughly inspecting the wall, looking for cracks, loose stones, and gaps. Pay special attention to areas where the mortar has deteriorated, as this indicates a significant problem that requires immediate action.
Depending on the extent of the damage, you’ll need to gather tools and materials for repair. You’ll want to consult with a local hardware store or masonry professional to ensure you have the right products for your specific wall and repair needs. Once you have all the necessary items, clear and protect your work area.
Gather the Tools and Materials
To keep stone walls looking and functioning their best, it is important to take the time to thoroughly assess the damage and gather the tools and materials needed to repair them. This includes removing damaged stones, cleaning and preparing the remaining stone, and mixing and applying the mortar.
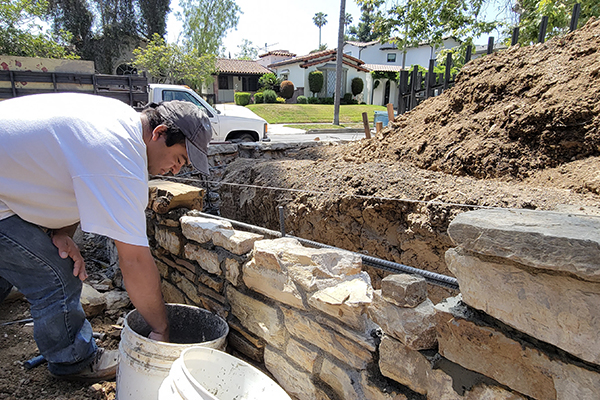
It is also important to ensure that the stones used in any repair match those of the original wall. Otherwise, the repaired wall may look inconsistent and lack the cohesiveness that makes a stone wall attractive.
During this process, it is helpful to sort the stones as you remove them from the wall. This helps speed up the rebuilding of the wall. Generally, large through stones should be set closest to the wall while small hearting stones should be set farther away.
Clean and Prep the Stones
Organize your tools and materials, then clear away any loose stones. Cover adjacent surfaces with tarps or plastic drop cloths to protect them from dust, debris and accidental damage as you work on the wall.
Depending on the type of stone, use water cleaning or a chemical solution to remove moss, mildew, dirt and discoloration. Always test the cleaner on a small area to ensure it’s safe for your specific stone.
Sort the removed stones into piles by size, shape and color, and set them aside in a secure location so they don’t get lost or damaged during the repair process. A thorough cleaning and treatment with a water repellent sealer is the finishing touch that enhances the look of your restored stone wall and extends its lifespan.
Mix and Apply Mortar
Once you have your materials ready, mix and apply the mortar needed to repair your damaged stone wall. Use a lime-based mortar mix without Portland cement additives to replicate the original mortar used in the wall.
Work to carefully rebuild your section of the wall, using a photo as a guide. Make sure that all stones are properly positioned so they aren't susceptible to internal stress over time.
Once the area of your damaged wall has been repaired, finish and seal it. This will help to protect the walls from water infiltration and other damaging conditions, as well as add a beautiful aesthetic to your landscape.
Replace the Stones
Whether used to define property lines, create garden paths, or build retaining walls, stone walls add elegance and charm to any outdoor space. But like any other outdoor structure, stone walls can become damaged over time from weathering and general wear and tear. If your stone wall is damaged, it's important to repair it as soon as possible to ensure the safety and longevity of your investment.
By thoroughly assessing the damage, gathering tools and materials, cleaning and prepping the stones, and mixing and applying mortar, you can restore your stone wall to its former glory. To further protect your investment, consider adding a protective sealer to the repaired surface. This will prevent moisture infiltration and prolong the lifespan of your beautiful stone wall.
The first step to repairing stone walls is to assess the damage and gather tools and materials. Then, prepare the work area by clearing away plants and debris. If you’re replacing stones or repairing cracks and gaps, choose replacements that closely match the original stones for a cohesive look. Finally, finish and seal the wall…